Below is information on Wycliffe's remote learning. This page is in the process of being updated so check back often.
Zoom is our collaboration software. There is a one time install of a Zoom extension required. It is strongly recommended to use Chrome or Firefox and not use Internet Explorer.
- If you have Skype or other video collaboration software on your computer you must completely exit that software or Zoom and the other software will fight for control of your webcam/audio.
- If you experience audio video issues try restarting your computer and rejoining the class
- If you are experiencing difficulties contact tspratt@wycliffe.utoronto.ca. Please be specific: Have you restarted your computer (once is sufficient); What browser are you using (Google Chrome, Firefox, Safari); What class are you trying to join; Are you having difficulty seeing/hearing the class; Are you having difficulty in being heard/seen in class; and other pertinent information.
Installing Zoom
- Click here to begin the process and follow the steps below. This is a test class only and not the actual class.
- Your default browser (in this example Google Chrome is used) will open and begin downloading a file.
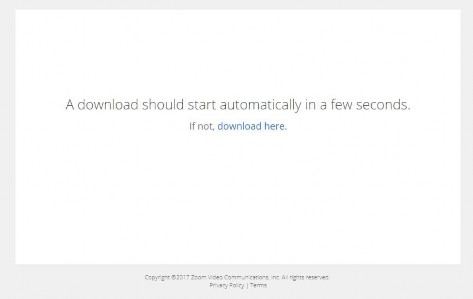
- Once downloaded, install the software by double clicking the download.

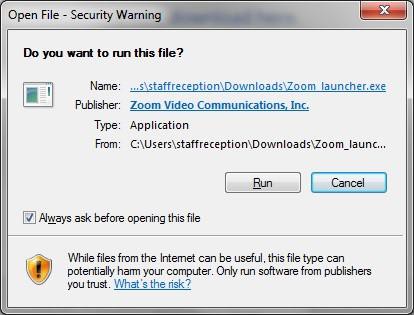
- Acknowledge you want to install the software by clicking “Run”.
- Once installed Zoom should automatically run, but if it doesn’t Click on the link in step one again.
- The waiting room is enabled for this Zoom session. Your setup is complete so you can close the window at this point.
Now that you have setup Zoom you should think about your environment. The best environment is quiet, well lit, and free from distractions both for you and your online Zoom compatriots. Coffee shops or outdoors should be avoided as a place to join a Zoom session.
Audio
- Computer Audio: Always choose to join the Zoom session with computer audio unless you need to phone in.
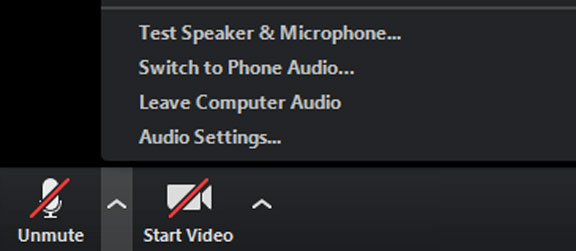
- Testing your Audio: If you are having problems hearing or being heard, you can "Test Speaker & Microphone..." by clicking on the up arrow to the right of the microphone in the bottom left corner of the window.
- Headphones with a microphone: For the best experience you should have a set of headphones or earbuds with a microphone so you can hear and be heard. Potentially every room has ambient sound, voices off camera or in an adjacent room, road noise, nearby construction, etc, and even though you barely hear it the microphone on your device can pick it up and magnify it. Headphones with a mic eliminates these extra sounds.
- Mute: And finally, it is best to mute your microphone until you wish to contribute or ask a question. To do that, click on the microphone icon in the bottom left corner. A red line through the microphone means its muted. Clicking the microphone icon a second time takes you off of mute.
Video
- Lighting: The best lighting is overhead lighting and you should not sit in front of a window, even windows with shades.
- Background: It is best to sit with a wall behind you, a books shelf, trophies, items from trips, and other items can be good conversation starters. You may not want family pictures for privacey reasons. It is best not to have an open area as a backdrop if you share your area with others. There are some funny but embarassing stories of Zoom cohorts seeing something that was better not seen.
- Mute: Your camera should be on at all times so the instructor can see you, however if you wish to turn your camera off for breaks, click on the camera icon in the bottom left corner. A red line indicates your camera is off, clicking it a second time turns it on.
Technology Recommendations and Requirements
Minimum Technical Requirements
Wycliffe College has identified the following minimum technical requirements needed for students to access remote/online learning:
| Requirement | Windows-based PC | Apple Mac/macOS-based PC |
|---|---|---|
| Operating System | Windows 10 | macOS X |
| Web Browser | Firefox or Google Chrome | Firefox or Google Chrome |
| Processor | Intel Core i5 based model | Intel Core i5 based model |
| RAM/Memory | 4 GB | 4 GB |
| Storage | 5 GB of available space | 5 GB of available space |
| Screen Resolution | 1024 x 768 | 1024 x 768 |
| Connectivity | Ethernet or WiFi; available USB port(s) to accommodate recommended accessories | Ethernet or WiFi; available USB port(s) to accommodate recommended accessories |
PC refers to a personal computer. A suitable PC may be a Windows- or macOS-based desktop or a laptop. A laptop is recommended. While much can be done with Chromebooks, tablets, smartphones, and other mobile devices, they are not guaranteed to support all course related software requirements.
The current version of Firefox or Google Chrome browser is recommended. These browsers are available for all platforms. A current and supported browser ensures the latest functionality and security updates are available.
Please reference the information below for additional information regarding recommended accessories, internet connectivity and frequently asked questions.
Speakers, Microphone or Headphones
Many courses will have synchronous (live) online meetings using webinar software. While many PCs are equipped with speakers and a microphone, using headphones with an attached microphone for these sessions is recommended.
Video Camera
Many courses will have synchronous (live) online meetings using webinar software. While many laptop PCs are equipped with a video camera, some laptop PC and most desktop PC users may need to use a compatible USB video camera.
Internet Speed
High speed broadband access (LAN, Cable or DSL) with minimum download speed of 5Mbps is strongly recommended.
Wired Connections
A wired connection (ethernet) to the home router is also recommended over WiFi connectivity to achieve the most reliable results.
Using Mobile Devices for Tethering
If broadband connectivity is not available, tethering to a mobile device such as a smartphone with strong signal and minimum download speeds of 5 Mbps is an option, although not recommended. Mobile Internet connectivity through a tethered mobile device will likely not be adequate for online video collaboration as the network latency and unreliable nature of cellular connectivity can result in poor video quality.
Data Plan Allowances
Expanded use of your Internet connections (broadband or mobile) may cause you to exceed your monthly data plan allowance and result in significant overage charges. An unlimited data plan, if available, is highly recommended.
Accessing downloads of productivity software such as Microsoft Office?
Many courses require the use of productivity software – word processing, presentation, and spreadsheet applications. The Microsoft Office suite of applications is available for free to University of Toronto students (UTORid and @utoronto.ca email address required). Office applications (e.g., Excel, Word, PowerPoint) may accessed via a browser or may be installed on your PC.
Access: https://mail.utoronto.ca.
The online app menu can be accessed by clicking on the waffle icon in top left hand corner. PC installable software may be downloaded by accessing the app menu and clicking on Office 365. From the Office 365 page, select Install Office.
- Share Desktop (PowerPoint)
- Whiteboard (type and draw)
- Chat
- Leave class
When in class and you want to pin the professor's video so you do not see the student who is talking, right click on the icon of the professor and "Pin Video". This only works on the small icon at the top or side of the window.
Share Desktop
To share your PowerPoint, Google Slides, etc from your desktop follow these instructions. Only one person can share their desktop at one time. Be aware the session is being recorded, so close all personal windows, such as banking, email, etc.
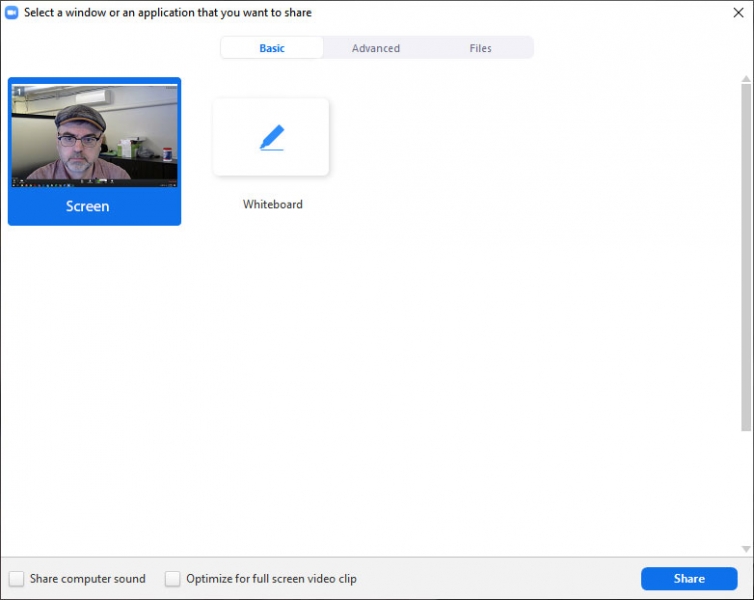
- Click on Share at the bottom of your screen. You need to move your mouse to make the option appear.

- Click Screen in the top left corner. If there is audio in your presentation click the box "Share computer sound". Click the blue Share button in the bottom right corner of the window. From this point everything you do on your desktop, such as showing your PowerPoint, will be visible to everyone in the session. If you have two or more monitors on your computer you will need to make sure the PowerPoint appears on your main screen, do not enable "Presenter view".
- Once you are sharing the bottom tool bar moves to the top of your screen. To stop sharing, click on "Stop Share".

Whiteboard
Whiteboard can be used to type text, handwrite (with your mouse), or draw images. If you are sharing your screen you will need to "Stop Share" before you can share the whiteboard.
- To use a whiteboard to write notes, draw images, etc click on Whiteboard in step two above. The Whiteboard will display a number of tools available. I will only highlight the three most used tools, but feel free to experiment with the other tools:
- Text: Click the word "Text", click anywhere in the whiteboard area, begin to type
- Draw: Click "Draw", select the thickness of your line, press and hold the left button on your mouse and move your mouse around
- Eraser: Click "Eraser" and click on the text or drawing that you want to erase
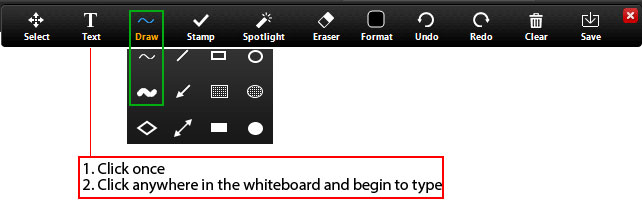
- If you want to create a blank whiteboard, click on the icon in the extreme bottom right of the whiteboard.

Chat
Zoom allows participants to chat with individuals or everyone in the session.
- Click Chat on the tool bar. You need to move the mouse to see the toolbar at the bottom.
- The default is Everyone will see your message. Click on Everyone at the bottom of the chat window to select a specific person.

Leave Session
To leave the class click "Leave Meeting" at the bottom right of the window. Move mouse to view tool bar.

Hosts are able to create breakout groups automatically or manually. This feature is only available to hosts, not co-hosts.


